How to Use Git: A Comprehensive Reference Guide
September 15, 2024 | by Petyo Lazarov
Introduction to Git
Git is a powerful and widely adopted version control system (VCS) that serves a crucial role in managing source code during software development. Originally created by Linus Torvalds in 2005, Git was designed to handle projects of varying sizes efficiently, allowing developers to track changes, collaborate seamlessly, and maintain a comprehensive history of their code. Utilizing a distributed architecture, Git empowers multiple contributors to work on a project simultaneously, thus improving productivity and minimizing the potential for code conflicts.
One of the primary advantages of using Git is its ability to record changes in a structured manner. As developers work on their projects, they can commit their modifications to the local repository, creating a snapshot of their code at a specific moment in time. This feature allows developers to revert back to earlier versions, explore the history of changes, and understand the evolution of the codebase, ultimately enhancing overall project management.
Moreover, Git exhibits robust branching capabilities, enabling developers to create isolated lines of development. With branches, teams can work on new features, bug fixes, or experiments independently without disrupting the stability of the main codebase. Once the work on a branch is complete, it can be merged back into the primary branch, ensuring that all modifications are integrated smoothly.
Key terminology associated with Git includes the repository, which serves as the central storage for project files; commits, which document changes made to the files; branches, allowing for separate lines of development; and merges, which integrate distinct branches back together. Understanding these fundamental concepts is essential for effectively utilizing Git in software development. By grasping these core terms, developers can navigate the intricacies of Git with confidence as they embark on their version control journey.
Setting Up Git and Initializing a Repository
Installing Git is the first step in harnessing its powerful version control capabilities. The installation process varies slightly across operating systems, so it is crucial to follow the appropriate steps for your environment. For Windows users, the Git installer can be downloaded from the official website, where a straightforward setup wizard guides you through the installation. On macOS, Git can be easily installed via Homebrew with the command brew install git, or it can be obtained by installing the Xcode command line tools. Linux users typically find Git in their distribution’s software repository; for example, a simple sudo apt-get install git command will suffice for Ubuntu distributions.
Verify your Git version with the following command, which will also ensure that Git is installed:
git --versionOnce Git is installed, the next crucial step is to configure your user information. This configuration is vital as it associates your commits with your identity. Users should execute the following commands in the terminal to set their name and email address:
git config --global user.name "Your Name"git config --global user.email "your.email@example.com"This global configuration ensures that your information is consistent across all repositories on your system. However, if needed, individual repositories can also have their configurations set without affecting the global settings.
After setting up Git, you will want to create a new repository. This can be done in two simple ways: creating a repository from scratch or cloning an existing one. To initialize a new repository, navigate to your project directory and run git init, allowing Git to start tracking your project files. If your intention is to collaborate on an existing project, use the git clone command followed by the repository URL to create a local copy.
git clone https://www.github.com/username/repo-nameDisplay the remote repository for your current Git directory:
git remoteFor more detailed output, add the -v flag:
git remote -vChoosing a meaningful project name is essential during this setup. The name should accurately reflect the project’s purpose, making it easily identifiable for collaborators or future reference. By adhering to these best practices, you lay a solid foundation for effective use of Git in your development workflow.
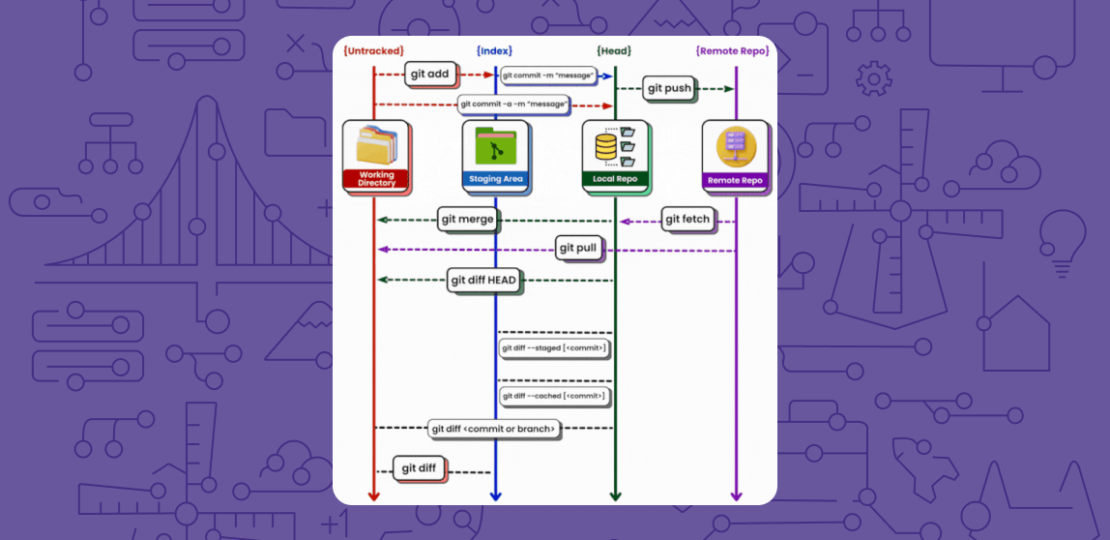
Staging Changes in Git
The staging area in Git, also known as the ‘index,’ serves as a crucial intermediary between the working directory and the repository. It allows developers to assemble a set of changes that they intend to commit, providing them with the ability to craft commits deliberately and with precision. Understanding the significance of the staging area is fundamental for any developer working with Git, as it streamlines the process of managing modifications.
Review the status of your Git repository, showing both unstaged added files and those that are staged for commit.
git statusThe primary command used for adding files to the staging area is git add. This command functions in various ways, allowing users to stage individual files, directories, or groups of files. For instance, executing git add filename adds a specific file to the staging area
git add my_function.phpwhile git add . stages all changes within the current directory, including new, modified, and deleted files.
git add .This flexibility facilitates efficient workflows, particularly when a project involves numerous files undergoing simultaneous changes.
Reviewing the staging area before committing changes is a best practice that can prevent errors. Developers can use the git status command to obtain a snapshot of the current state of the working directory and staging area. This command clearly distinguishes between files that are staged for commit and those that are not, enabling developers to verify their changes prior to committing. Additionally, the git diff --cached command offers a detailed look at what is staged, making it easier for developers to ensure that only intended modifications are included in the next commit.
By leveraging these commands effectively, developers can utilize the staging area, easing the transition from mere file edits to finalized commits, ultimately enhancing their project management and collaboration capabilities within Git.
Committing Changes to Your Repository
Committing changes in Git is a crucial step in version control that allows developers to record modifications to a repository. Once changes are staged, a commit is created to encapsulate the recorded changes, signifying a snapshot in the project’s history. To execute a commit, the command git commit is utilized, often accompanied by the -m flag to add a commit message. For instance, a simple command can be written as git commit -m "Fix bug in user authentication". This command effectively captures the changes made to the codebase, along with a succinct description of the modifications.
Writing effective commit messages is essential to facilitate better understanding and track changes easily. A well-crafted commit message should be concise yet informative. It typically consists of a short summary in the imperative mood, followed by a detailed description if necessary. A good practice is to limit the summary to about 50 characters, while the more detailed explanation can extend up to 72 characters to ensure readability. For example, a commit message such as git commit -m "Add unit tests for payment processing" clearly indicates the nature of the update.
In addition to committing changes, developers can review the commit history to understand the evolution of the project over time. This can be accomplished with the command git log, which displays a chronological list of commits, showing their respective messages, authors, and timestamps. Utilizing options with the log command, such as git log --oneline, can provide a more condensed view. Overall, mastering the commit process and developing a habit of writing clear commit messages are vital practices that enhance collaboration and maintainability in Git-managed projects.
Working with Branches in Git
Branching in Git is a powerful feature that facilitates users to work on multiple versions of a project concurrently. This enables developers to implement new features, fix bugs, or experiment with different approaches without compromising the stability of the main codebase, typically known as the master or main branch. Understanding how to effectively create, list, switch, and delete branches is crucial for maintaining a well-organized workflow in any Git-based project.
To create a new branch, the command git branch [branch-name] can be utilized. This command creates a new branch based on the currently checked-out branch but does not switch to it automatically. To simultaneously create and switch to a new branch, one can use git checkout -b [branch-name]. This approach is particularly useful when starting a new feature, allowing developers to isolate their changes from the primary code while still having access to the mainline work.
Listing all available branches is straightforward with the git branch command, which displays all branches in the repository. The active branch will be highlighted, indicating the current working context. To switch between branches, git checkout [branch-name] is the command of choice. This functionality is essential when a developer needs to revisit a previous feature or finish a task on a different branch.
Upon completion of a feature or task within a branch, it is important to remove unused branches to maintain a clean project. This can be accomplished with the command git branch -d [branch-name]. It is vital to ensure that the branch has been merged into the main branch before deletion to avoid losing valuable work.
Overall, effective use of branching in Git not only enhances project organization but also allows teams to collaborate more efficiently, ensuring that each feature can be developed independently while minimizing conflicts and interruptions to the main workflow.
Collaborating and Updating in Git
Collaboration is a central aspect of using Git, enabling multiple contributors to work on the same project efficiently. The process begins by fetching updates from a remote repository. By executing the command git fetch, you retrieve the latest changes made by other contributors without altering your local working files. This allows you to review changes before integrating them into your local branch.
To incorporate these updates into your working environment, the git pull command can be utilized. This command combines git fetch and git merge, automatically downloading and merging changes from a remote repository into your current branch. Remote branching is an essential feature in Git that facilitates team collaboration, allowing team members to operate on different branches before merging their work into a shared main branch.
As multiple developers work on a project, conflicts can arise if two or more contributors modify the same line of code. Git will alert you when a conflict occurs, and you will need to intervene to resolve the discrepancies. In such cases, Git marks the areas of conflict within the files, and users must manually edit these sections to finalize the changes. The git status command can help you identify files that require attention during this process.
Once you’ve made the necessary adjustments, you can proceed to push your local changes to the remote repository using the git push command. This updates the remote repository with your commits, making them available to other collaborators. Maintaining a clear and consistent commit history through meaningful commit messages will foster better communication within the team and enhance the overall project management process.
Collaboration in Git, when executed thoughtfully, can significantly streamline the development workflow, encouraging efficiency and productivity among team members.
Inspecting Your Repository’s History
Understanding the history of your Git repository is vital for effective project management. The commit history records every change made to a project, allowing developers to track modifications, collaborate more efficiently, and revert to previous states if necessary. To view the commit log, you can utilize the git log command, which displays a chronological list of all commits made along with corresponding details such as the commit hash, author, date, and commit message.
By default, the git log command outputs a comprehensive list, but you can utilize various options to customize the information displayed. For instance, adding the --oneline flag provides a condensed view that shows each commit on a single line. Additionally, using the --graph flag can visualize branch structure and split merges, making it easier to understand the relationships between different commits.
To inspect specific changes made in previous commits, you can use the git show command followed by the commit hash. This command provides detailed information about a single commit, including the actual changes to files. Another useful tool is the git diff command, which allows you to compare differences between commits, branches, or even working directories. For example, git diff commit1 commit2 displays the changes made from commit1 to commit2. This capability is pivotal when testing, debugging, or analyzing the evolution of your project’s codebase.
Moreover, leveraging the git blame command can help you gain insights into who made a particular change and when. This command displays the last modification for each line in a file, making it easier to track down the origin of specific code segments. By mastering these commands, developers can effectively inspect their repository’s history, ensuring a deep understanding of changes over time.
Showing Changes in Git
Tracking and showing changes in a Git repository is essential for developers to understand their progress and the evolution of their code. One of the primary commands used for this purpose is git diff. This command allows users to compare changes between files in their working directory and the last committed version. By executing git diff in the terminal, developers can review the modifications made to the code before staging any changes for a commit. This ensures that any adjustments are intentional and aligns with the overall project goals.
In practice, git diff displays the differences line by line, highlighting additions in green and deletions in red. This visual representation aids developers in quickly assessing what has changed since the last commit. Additionally, users can pass different flags with the git diff command to modify its output. For instance, git diff --staged allows users to see changes that have been staged for commit, thereby providing additional clarity before finalizing changes.
Moreover, Git enables users to visualize changes between branches. By using the command git diff branch1..branch2, developers can compare specific branches within their repository. This capability is particularly beneficial when assessing the differences between a feature branch and the main branch, allowing teams to coordinate effectively and integrate code seamlessly. Furthermore, viewing the differences prior to a merge can help prevent conflicts and ensure compatibility between codebases.
In conclusion, leveraging the git diff command and similar Git features empowers developers to monitor their changes effectively. Mastering these tools fosters better collaboration and contributes significantly to the overall development workflow. Understanding the nuances of showing changes in Git is crucial for maintaining a well-organized and functional repository.
Stashing Changes for Later
In the realm of version control systems, Git provides an efficient mechanism known as “stashing” to manage changes that are not yet suitable for committing. Stashing is particularly useful when developers need to switch branches or pull updates from a remote repository while ensuring that their current work is not lost. Essentially, stashing allows users to temporarily set aside modified tracked files and even untracked files, preserving the state of the working directory.
To stash changes in Git, users employ the command git stash. This command captures the modifications made to the working directory and saves them in a stack-like structure. For instance, if a developer has made several changes but needs to temporarily shift to another task, executing git stash will store those changes, enabling the user to revert to a clean working directory. This is particularly beneficial in collaborative environments where interruptions may arise.
Moreover, stashed changes can be reapplied to the working directory at any time. This is accomplished using the command git stash apply, which retrieves the most recent stashed changes. Alternatively, users can specify a particular stash entry if there are multiple by using git stash list to view the stashed items and git stash apply stash@{n} for reapplying a specific stash.
Should a user determine that certain stashed changes are no longer necessary, the command git stash drop removes them from the stash stack. For those who want to apply stashed changes and simultaneously remove them from the stash, the git stash pop command is available, streamlining the process significantly. By utilizing these commands, Git users can manage their workflow effectively, providing flexibility in handling unfinished changes while ensuring progress is not lost.
Ignoring Files with .gitignore
In software development, maintaining a clean and efficient commit history is paramount. An effective way to ensure this cleanliness is by using a .gitignore file to specify which files or directories Git should overlook. It is common for developers to generate files that are not necessary for version control, such as logs, temporary files, or configuration files that contain sensitive information. When these files are inadvertently tracked by Git, they can clutter the repository and lead to unnecessary complications during collaboration.
Creating a .gitignore file is a straightforward process. This file should be placed at the root of your Git repository and can contain various patterns that match files or directories you wish to ignore. The patterns can include wildcards, file extensions, or even entire directory names. For example, if you want to ignore all log files, you can add the line *.log to your .gitignore file. Similarly, if there is a directory named ‘temp’ that you want Git to ignore, include the line temp/ in the file. This way, any changes made to these files or directories will not be tracked, safeguarding the integrity of your version history.
It is crucial to note that .gitignore only affects untracked files. If a file has already been added to the repository, merely adding it to the .gitignore will not prevent it from being tracked. To remove such files from Git’s tracking, you will need to utilize the git rm –cached command, followed by the filename. This action keeps the file in your local directory but removes it from the repository’s tracking. Understanding how to effectively use a .gitignore file not only streamlines the development process but also enhances collaboration among team members.
Rebasing, Reverting, and Resetting Changes
Git offers several advanced features for managing and manipulating your commit history, among which rebasing, reverting, and resetting changes are crucial. Understanding the differences among these operations is fundamental for effective version control and repository management. Each method serves a distinct purpose that can enhance the clarity and organization of your commit history.
Rebasing is a process that allows users to move or combine a sequence of commits to a new base commit. This is particularly useful when you want to maintain a linear project history. By using commands such as git rebase, you can integrate changes from one branch into another branch while preserving a clean commit history. For example, if you have been working in a feature branch and want to incorporate changes from the main branch without creating a merge commit, rebasing would be your go-to solution.
On the other hand, reverting changes is about creating a new commit that undoes the changes made by a previous commit. The command git revert allows you to specify which commit you wish to revert. This is particularly beneficial in collaborative environments where the integrity of the commit history must be maintained. Instead of deleting commit history, reverting keeps a record of all changes while effectively negating any undesired modifications.
Lastly, resetting changes is a more drastic operation that alters the current branch’s commit history. The command git reset can reset your working directory and index to a specific commit, effectively removing commits from the history. This could be useful during local development when your branch diverges from the expected direction, allowing for a fresh start. However, it is important to use this command with caution, especially in shared branches, as it can lead to inconsistencies and confusion among collaborators.
Conclusion: Mastering Git
As we have explored throughout this guide, mastering Git is essential for software development and collaboration in today’s fast-paced digital environment. Git serves as a powerful version control system that not only tracks changes but also facilitates teamwork and enhances project management. By understanding the fundamental concepts of Git, such as repositories, commits, branches, and merges, developers can streamline their workflow and minimize the risk of errors in code.
We have highlighted the key capabilities of Git, including its branching model that allows for isolated development and experimentation, as well as its robust history tracking that enables easy reversion to previous states of the project. The ability to collaborate with team members seamlessly through pull requests and code reviews cannot be overstated; Git fosters communication and promotes quality assurance within teams. Additionally, integrating Git with platforms like GitHub or GitLab enhances the collaborative experience further by providing an interface for project visibility and automation.
To truly become proficient in Git, it is crucial for developers to practice the techniques covered in this guide regularly. Engaging with online resources, tutorials, and projects will solidify your understanding and competence in employing Git effectively. Whether you’re working solo on personal projects or collaborating within larger teams, the mastery of Git will empower you to manage your codebase with confidence, ensuring that your development practices are efficient and reliable.
For those looking to deepen their knowledge, consider exploring further learning materials, such as advanced courses, documentation, and community forums. By actively enhancing your Git skills, you position yourself as a valuable asset in the development landscape, paving the way for successful projects and professional growth.